
Introduction
Thinning shears, also known as texturizing shears or blenders, are specialized hair cutting tools designed to remove bulk from the hair without significantly shortening its length. They feature one blade with teeth and one regular cutting blade, allowing them to cut only a portion of the hair strands with each snip. This creates a softer, more natural look, reduces weight, and helps blend different hair lengths seamlessly. While they may seem intimidating at first, understanding how to use thinning shears effectively can transform your hair styling routine, whether you are a professional stylist or an individual looking to manage your hair at home. This guide will walk you through everything you need to know, from selecting the right shears to mastering various techniques and avoiding common pitfalls.

The primary purpose of thinning shears is to reduce volume, soften harsh lines, and create texture. They are particularly useful for thick, heavy hair that tends to look bulky or for hair that needs better movement and flow. Unlike regular scissors that create a blunt cut, thinning shears provide a more diffused effect, making them ideal for blending layers, softening ends, and creating a more natural finish. However, improper use can lead to choppy results, excessive thinning, or even damage to the hair. Therefore, it is crucial to learn the correct techniques and understand when and where to apply them. This guide aims to demystify the process, providing clear, step-by-step instructions to help you achieve professional-looking results.
Key Points
Understanding Thinning Shears
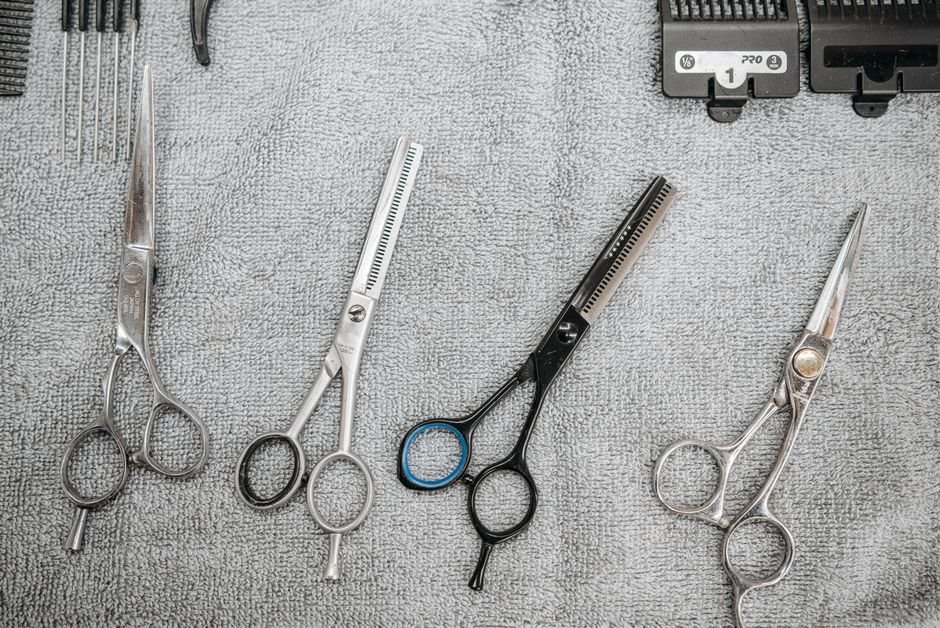
Before diving into the techniques, it is essential to understand the different types of thinning shears and their functions. The main distinction lies in the number of teeth on the bladed side. More teeth mean a finer cut and less hair removed per snip, while fewer teeth remove more hair and create a more noticeable texture.
- 20-25 Teeth (Texturizing Shears): These shears remove a moderate amount of hair, typically 20-25%. They are excellent for creating texture, adding movement, and blending layers.
- 30-40 Teeth (Blending Shears): Often called blending shears, these remove less hair, usually 10-15%. They are ideal for softening lines, blending short and long sections, and creating a very natural finish without aggressive thinning.
- 10-15 Teeth (Chunking Shears): These have wider gaps between the teeth and remove a larger percentage of hair, around 40-50%. They are used for dramatic texturizing, creating chunky layers, or removing significant bulk from very thick hair. Use these with caution as they can easily create noticeable gaps if not used correctly.
Choosing the right type of thinning shear depends on the hair type you are working with and the desired outcome. For most at-home users, a blending shear with 30-40 teeth is a safe and versatile choice.
Preparing the Hair
Proper preparation is key to achieving good results when using thinning shears.
- Wash and Condition: Start with clean, detangled hair. This ensures that the shears can glide smoothly through the hair and prevents snagging.
- Towel Dry or Lightly Dampen: Thinning shears work best on hair that is slightly damp but not soaking wet. Excess water can make it difficult to gauge how much hair you are removing and can lead to over-thinning once the hair dries.
- Comb Through: Thoroughly comb the hair to remove any knots or tangles. This allows for an even distribution of hair and helps you identify areas that need thinning.
- Section the Hair: Divide the hair into manageable sections using clips. This helps you work systematically and prevents you from missing spots or over-thinning certain areas.
Basic Thinning Techniques
Here are the fundamental techniques for using thinning shears:
1. Reducing Bulk (Mid-Shaft Thinning)
This technique is used to reduce overall volume without affecting the length or shape of the hairstyle. It is most effective on thick hair.
- Identify the Section: Take a small section of hair (about 1-2 inches wide) from the area where you want to reduce bulk.
- Hold the Hair: Hold the section straight out from the head, perpendicular to the scalp.
- Position the Shears: Open the thinning shears and place them about 2-3 inches away from the roots, mid-shaft of the hair section. Never place them too close to the roots, as this can create very short, spiky hairs that stand up.
- Make a Single Snip: Close the shears once, firmly but gently. Do not slide the shears down the hair. This single snip removes a portion of the hair strands from that specific spot.
- Repeat and Blend: Move to the next section and repeat the process. Work systematically around the head, focusing on areas with excessive thickness. After thinning a section, comb through it to check the density and blend.
2. Softening Ends (Point Cutting with Thinning Shears)
This technique is used to soften the ends of the hair, remove blunt lines, and create a more textured, natural finish. It is excellent for blending layers.
- Isolate the Section: Take a small section of hair at the ends where you want to soften.
- Hold the Hair: Hold the section straight down or at the angle you want the ends to fall.
- Position the Shears: Hold the thinning shears vertically or at a slight angle to the hair ends.
- Make Multiple Snips: Gently snip into the very ends of the hair, moving the shears slightly with each snip. Avoid cutting straight across. The goal is to create a diffused, feathered effect.
- Check and Refine: Comb through and assess the softness. Repeat if necessary, but always err on the side of caution to avoid over-thinning.
3. Blending Layers
Thinning shears are invaluable for blending harsh lines between layers, creating a seamless transition.
- Identify the Transition Point: Locate where one layer ends and another begins, creating a visible line.
- Take a Small Section: Gather a small section of hair that includes both the end of the shorter layer and the beginning of the longer layer.
- Angle the Shears: Hold the thinning shears at an angle parallel to the line you want to soften.
- Snip and Glide (Optional): Make one or two gentle snips through the transition area. For a very soft blend, you can gently slide the shears a very short distance (no more than an inch) as you close them, but be extremely careful with this technique as it can easily remove too much hair.
- Comb and Check: Comb through the section to see if the line has softened. Repeat lightly if needed.
Tips for Success
- Start Small: Always begin by removing a small amount of hair. You can always take more off, but you cannot put it back.
- Work in Sections: Sectioning the hair ensures even thinning and prevents you from missing spots or over-thinning.
- Use a Comb: A fine-tooth comb is essential for parting, holding, and checking the hair after each snip.
- Angle Matters: The angle at which you hold the shears affects the outcome. Holding them vertically creates more texture, while holding them horizontally removes more bulk.
- Check Your Work Regularly: Comb through the hair frequently and assess the results from different angles.
- Clean Shears: Ensure your thinning shears are clean and sharp. Dull shears can pull and damage the hair.
- Patience is Key: Take your time, especially if you are new to using thinning shears. Rushing can lead to mistakes.
- Consider Hair Type: Fine hair requires less thinning than thick hair. Be very conservative when thinning fine hair to avoid making it look sparse.
Common Mistakes to Avoid
- Cutting Too Close to the Roots: This is one of the most common mistakes. Cutting too close to the scalp can result in short, spiky hairs that stick up and are difficult to style, creating a halo effect.
- Thinning the Hairline or Crown Excessively: These areas are more visible. Over-thinning can lead to sparse patches.
- Sliding the Shears Down the Hair: Unlike regular scissors used for slide cutting, thinning shears should generally be used with a single snip. Sliding them down the hair can pull and damage the hair cuticle, leading to frizz and breakage.
- Thinning Wet Hair: While slightly damp is good, thinning soaking wet hair makes it hard to judge how much hair is being removed, often leading to over-thinning once it dries and shrinks.
- Using on Fine or Damaged Hair: Thinning shears are not suitable for very fine, thin, or already damaged hair, as they can make it appear even thinner or exacerbate damage.
- Over-Thinning: This is the biggest mistake. It is easy to get carried away. Always remember to start conservatively and assess the results before removing more hair.
- Not Cleaning Shears: Hair and product buildup can make shears less effective and even damage them. Regularly clean your shears for optimal performance.
Maintenance of Thinning Shears
Proper care will prolong the life of your thinning shears and ensure they perform at their best.
- Clean After Each Use: Wipe down the blades with a soft cloth after each use to remove hair and product residue.
- Lubricate Regularly: Apply a small drop of scissor oil to the pivot screw periodically to keep the blades moving smoothly.
- Store Safely: Store your shears in a protective case or pouch to prevent damage to the blades.
- Professional Sharpening: Just like regular scissors, thinning shears need to be professionally sharpened when they become dull. Do not attempt to sharpen them yourself, as this can damage the teeth.
FAQs
Q1: Can I use thinning shears on all hair types?
A: Thinning shears are most effective on thick, coarse, or dense hair to reduce bulk and add movement. They should be used with extreme caution or avoided entirely on very fine, thin, or damaged hair, as they can make the hair appear sparser or cause further damage. If you have fine hair and still want some texture, opt for blending shears with many teeth and use them very sparingly on the ends.
Q2: How often should I use thinning shears?
A: The frequency depends on your hair type, growth rate, and desired style. For most individuals, thinning every 6-8 weeks is sufficient to maintain the desired volume and shape. Over-thinning can lead to a choppy or sparse look, so it is better to err on the side of less frequent use.
Q3: What is the difference between thinning shears and texturizing shears?
A: The terms are often used interchangeably, but generally, texturizing shears tend to have fewer, wider teeth, removing more hair and creating more noticeable texture or chunkier layers. Thinning shears (or blending shears) usually have more, closer-set teeth, removing less hair and creating a softer, more blended effect. For general at-home use, blending shears are often safer and more versatile.
Q4: Can thinning shears damage my hair?
A: When used incorrectly, thinning shears can indeed damage hair. Common issues include pulling or snagging hair (due to dull shears or improper technique), creating split ends, or causing frizz if the cuticle is disturbed too much. Always use sharp shears, make clean snips, and avoid sliding them down the hair shaft.
Q5: Should I use thinning shears on wet or dry hair?
A: It is generally best to use thinning shears on slightly damp hair. Hair that is too wet can be difficult to assess for density, leading to over-thinning. Dry hair can also be thinned, but it is harder to get a smooth cut, and the hair might move around more. Lightly damp hair provides the best balance for control and accurate assessment.
Q6: Can I thin my own hair at home?
A: Yes, with proper knowledge, tools, and caution, you can thin your own hair at home. However, it requires practice and a good understanding of your hair type and desired outcome. Always start with small amounts of hair and work slowly. For complex styles or significant changes, consulting a professional stylist is always recommended. For basic tasks like reducing bulk or softening ends, it is manageable for many individuals.
Q7: How do I know if my hair needs thinning?
A: Your hair might benefit from thinning if it feels heavy, bulky, lacks movement, or if your hairstyle looks too blunt and needs softening. If your layers are not blending well, or if you have a lot of volume that you want to reduce without losing length, thinning shears can be a great solution. If you’re unsure, a consultation with a hairstylist can help you determine if thinning is right for your hair.
Conclusion
Mastering how to use thinning shears is a valuable skill that can significantly enhance your hair styling capabilities. By understanding the different types of shears, preparing your hair correctly, and applying the appropriate techniques, you can effectively reduce bulk, soften harsh lines, and add beautiful texture to your hair. Remember the golden rule: start with less and gradually remove more if needed. Patience, precision, and a good understanding of your hair type are your best allies in achieving professional-looking results. Avoid common mistakes like cutting too close to the roots or over-thinning, and always prioritize the health of your hair by using sharp, clean tools. With practice, thinning shears can become an indispensable part of your hair care arsenal, helping you achieve a more manageable, stylish, and polished look.